
This sourdough pizza recipe is my favorite as it creates the perfectly crispy bottom, and chewy light crust. I’ve added a few variations if you would like to sneak in some whole grains. As well, I have some tips for working with different flours that can save you a little time and frustration.
Why Sourdough Pizza?
Pizza is a staple in our house, hence, how my sourdough journey began. It is my five year old son’s, food of choice for lunch and dinner, and I can’t deny, the occasional breakfast. So what do you do when your child wants to live on bread and cheese? Make that bread and cheese as healthy as possible. If you want to know a bit more about the health benefits of baking with sourdough, check out the about page, where I explain a bit about the fermentation of flour from a nutritional perspective.
Pizza Dough Requirements
I wanted to come up with a sourdough pizza dough recipe that could fit into a busy schedule of work and family life, it had to be convenient to make. This recipe met all my requirements. I needed a pizza dough that:
- Once cooked, reheats well, and tastes excellent from a lunch box.
- All ingredients can be mixed in right away. No autolyse necessary. (though if you have time, feel free to add a 30 minute to 1 hour autolyse, it can help with the strength of the dough, especially if your adding whole grains)
- Sourdough based pizza dough is a little time consuming to make, so I needed a dough that freezes well for later use; this dough is excellent for up to two weeks in the freezer without any compromise to texture and taste.
- A dough I can adapt other recipes to, such as a standard boule, sourdough focaccia, quick-ish sourdough croissants (coming soon), sourdough apple cheese tart.
A Bit About Flour
Different brands of flour can hold hydration differently even when the same “type” of flour, such as “bread flour”, or “all-purpose”. For instance, in this recipe using great planes flour from Costco, I find a hydration of 72-75 % works well. But, if I am using Robin Hood brand bread flour, it does much better at 66%, and any higher the dough feels to wet and is hard to work with. Both flours are considered “bread flour”, and are white, but they take on water differently, likely due to how they are processed, even though both are roller milled processed.
My Absolute Favorite Combination of Flour For Baking An Amazing Pizza Is:
- 90% bread flour
- 10% semola rimacinata flour
- 72% hydration (adjust according to your flour. The first mix will likely feel a bit dry or slightly lumpy, but all flour should be combined. I typically like to do a first mix, then rest the dough for 15-20 minutes, then mix again till smooth. I suggest a dough whisk for the first mix, then the Rubaud method for the second mixing. A standard mixer with dough hook may also be used, however this is a large batch and will require a minimum 5-quart mixer, my mixer is 4.5 quart and the dough comes up over the top of the dough hook when mixing.
- 2% Salt
- 4% Sugar
- 15% Active Sourdough Starter
This combination makes a pizza with a beautiful color crust and delicious texture.
Do You Want To Add Some Whole Grains For Health?
Recently I have been adding 10% durum, and a 15% blend of whole grains. My most recent 5% rye, 5% red fife, and 5% whole grain winter red wheat. This blend works out amazing, as it adds fiber and nutrients to the dough without compromising with the texture and taste. I actually find it enhances it, and it is now one of my favourite blends. If you want to experiment with higher amounts of whole grains by all means. I would suggest moving up 5% at a time and being mindful that you may need to make slight increases to your hydration, in the above mix I increased the hydration to 75%. If you are drastically increasing the amount of whole grains in your dough be aware you may need to building more strength in the dough with an additional lamination or coil folds.
Can I Use All-purpose Flour For This Recipe?
Yes, but, you will want to keep the hydration lower, as all-purpose contains less protein than bread flour and holds less water. I would start at 60-65% hydration and work up from there. I keep the flour in this recipe at 1000 grams to make the hydration conversions simple.
Tips For Freezing
If you plan on freezing all, or part of the dough for later use, do NOT let the ferment go too long. You want to divide off the portion you intend on freezing earlier in the fermentation process. I recommend no further than 4 hours into the process including active dough time. I have made the mistake of leaving the dough I intend on freezing in the fridge overnight for a cold ferment, then freezing it later. This resulted in a doughy pizza crust. You want to leave some fuel for the fermentation process, for when the dough defrosts. Hence do not leave dough out for long if you intend on freezing it.
What is Semola Rimacinata?
Semola Rimacinata is the Italian name for a very fine ground durum flour, with a high gluten content, and elastic texture that is ideal for pastas and breads. It can be found online, or at many Italian grocery stores. A similar flour you can substitute is No.1 fine durum atta, such as golden temple.
This Recipe is for a Large Batch, & Will Make:
1940 g dough
4 large x 485 g pizzas
6 medium x 323 g pizzas
8 small x 242 g pizzas
Simple, Freezer Friendly, Sourdough Pizza Dough
This sourdough pizza recipe is my favorite, as it creates the perfectly crispy bottom pizza with a chewy light crust.
10
minutesIngredients
1000 g flour (I like a combination of 900 g bread flour, and 100 g Semola Rimacinata)
720 g water
150 g active sourdough starter
40 g sugar (optional, but I find it helps with maintaining the quality of the dough in the freezer)
20 g salt
Directions
- Mix- Measure flour, and salt into a plastic container, set aside.
- Measure active starter into a very large glass bowl, add warm water, and sugar. Stir to combine.
- Slowly pour in flour mixing with a dough whisk or if you don’t have one a fork will do. Mix until well combined the dough will be fairly wet and a little lumpy. If you start to feel resistance in the dough let it rest for 20 minutes, and mix again until smooth.
- If you have time and are after amazing, I highly recommend resting the dough for 15-20 minutes, laminating the dough to build strength by preparing the counter with some cold water, and literally stretch the dough into a big sheet as far as you can without tearing it, and fold the dough back onto itself before placing in a dish prior to subsequent coil folds. As little as one coil fold can do a lot for dough strength, but as much as 4 can be done. Leave 30 minutes after lamination before coil fold, and 30 minutes between each subsequent coil fold.
- BULK FERMENT- In my kitchen in the winter I find 4-6 hours is usually sufficient, including active time.
- Turn dough onto lightly floured surface, and divide dough according to desired size, refer to divisions listed above, and place in reusable deli containers or Ziploc freezer bags, for storage for later use. If baking immediately shape into a ball and rest for 30 minutes before shaping.
- Dough can be stored in the refrigerator for 2-3 days, and freezer for 2 weeks.
- Baking
- Preheat oven to 500 degrees Fahrenheit. On a well floured surface stretch dough for pizza, a rolling pin may be used, but minimal handling is best for light airy crust.
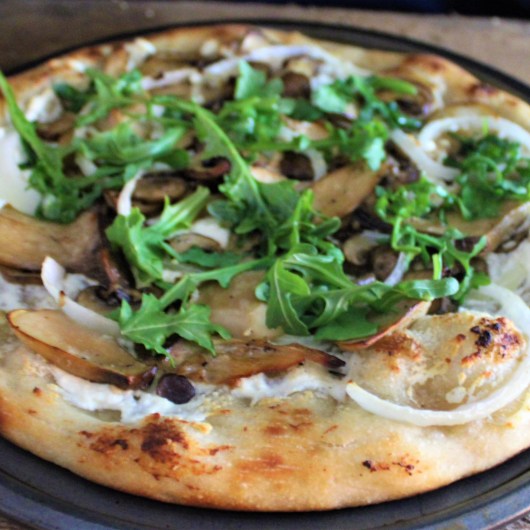
- Top as desired. On the above pizza I have dressed with mozzarella, ricotta, oyster mushrooms pre- roasted with garlic, sliced sweet onion, and finished with arugula and a few drops olive oil.
- Brush the edges with a bit of water to encourage browning, bake for 8-10 minutes. Keep a close eye, as you are baking at very high heat, and the actual oven temperature can very slightly.
How long do you let the dough sit before shaping after coming out of the freezer?
Hi Megan,
I usually take it out of the freezer and let it defrost in the fridge for about a day, then I let it sit on the counter 1-2 hours before shaping. I hope that is helpful.